8.1 KiB
timetracker INSTALL on macOS (using Keyboard Maestro)
Basic Installation
Use git clone to create a local copy of the timetracker repository on your
local macOS system. If you'd rather use the older, slower Python/Bash scripts,
you can then copy or link the timetracker.py, do_process.sh, and chug.sh
files into your path. I like to keep these in a ~/timetracker directory,
where I execute them with a leading ./ so they don't need to be in my PATH
variable.
If you'd prefer to use the Rust programs (which is highly recommended, if only
for execution speed), you will need to compile the Rust programs with cargo
(the Rust language package manager). Do the following, which requires
Homebrew:
-
Install the
rustpackage from Homebrew:brew install rustHomebrew may update itself before installingrust. -
Navigate to the
timetracker/rust/timetrackingdirectory in the clonedtimetrackersource directory -
Execute the following command:
cargo build --releaseIf you are intending to debug or otherwise develop the Rust programs, I recommend creating a fork on GitHub, making your proposed changes in your local clone of the fork, and then issue a PR against my parent repository. In that case you can drop the--releaseargument, which will keep debugging symbols and such in the executable. -
The compiled executables will be in the
target/releaseor thetarget/debugsubdirectories, depending on whether you provided--releaseto the build step (without this flag the executables will be in thedebugsubdirectory). You may copy them or link them to yourPATH(e.g.,~/bin) for use.- Note that if you're working on a specific program in the package, you can
change directory to whichever executable you're working on (
chug,doprocess,timetracker, or the library packagetimelogging), you will likely want to run the debug version directly, like so:cargo run -- <input arguments>## Pro Tips There are some things that you need to do in order to use timetracker like a pro. These instructions assume you're using the vim or gvim (GUI) editor. There are likely similar macros you can enable for editors such as Visual Studio Code, Sublime, but you'll have to review the documentation for those editors to be able to reproduce the ideas there.
- Note that if you're working on a specific program in the package, you can
change directory to whichever executable you're working on (
Here are the basics for using the timetracker (print summary of a timetracker
log file), do_process (print the summary of a log file broken down by
category), and chug (check a week's worth of logs); see the README.md for
details:
-
Use a desktop automation system, otherwise known as a macro system for automating potentially complex series of keystrokes or mouse movements or clicks. Examples include: Automator, espanso, or my personal favorite, Keyboard Maestro. The Keyboard Maestro software is sadly proprietary, and not free. I had become so dependent on it at my previous two employers that I cannot comfortably operate macOS as my daily driver without it. After the trial period you will need to purchase a license, currently at $36 for the latest version (as of this writing, 11.x).
These instructions assume Keyboard Maestro is already installed.
-
Launch Keyboard Maestro. Two pieces should launch, the Editor and the Engine. If the Engine is loaded you should see the
 in your toolbar.
 -
In the Keyboard Maestro Editor, select
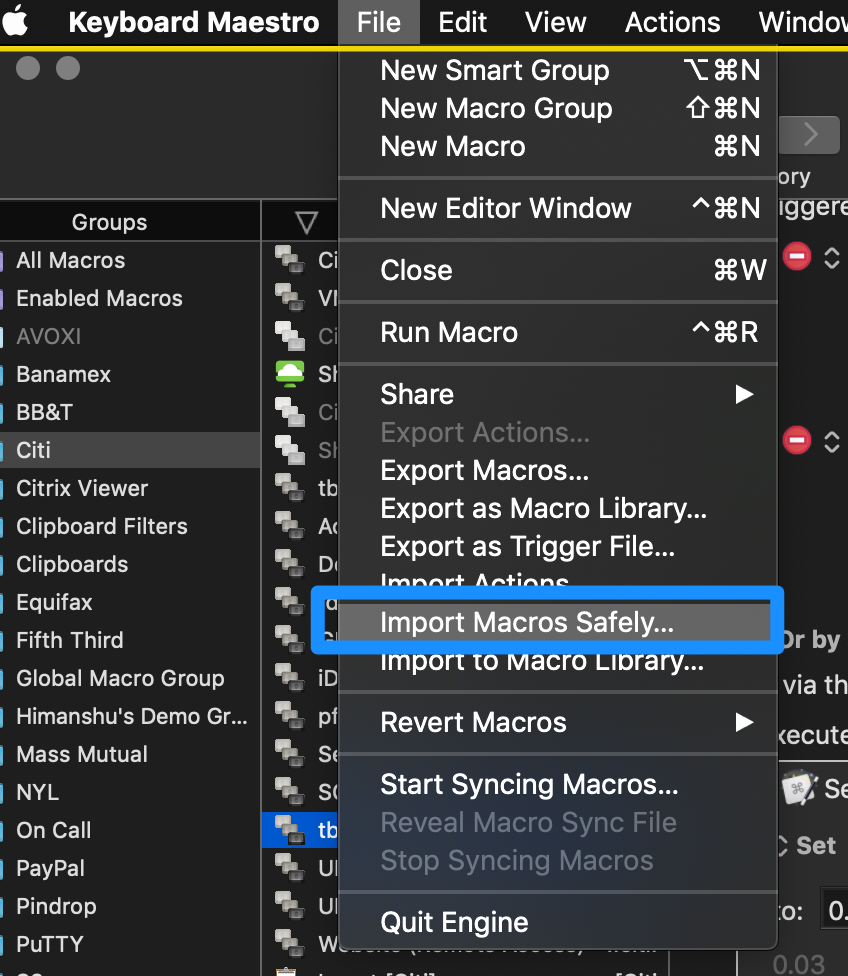 . Import the
 timetracker.kmmacrosfile into Keyboard Maestro. All imported macros will be disabled by default. -
Enable the "Insert Timestamp Begin" and "Insert Timestamp End" macros:
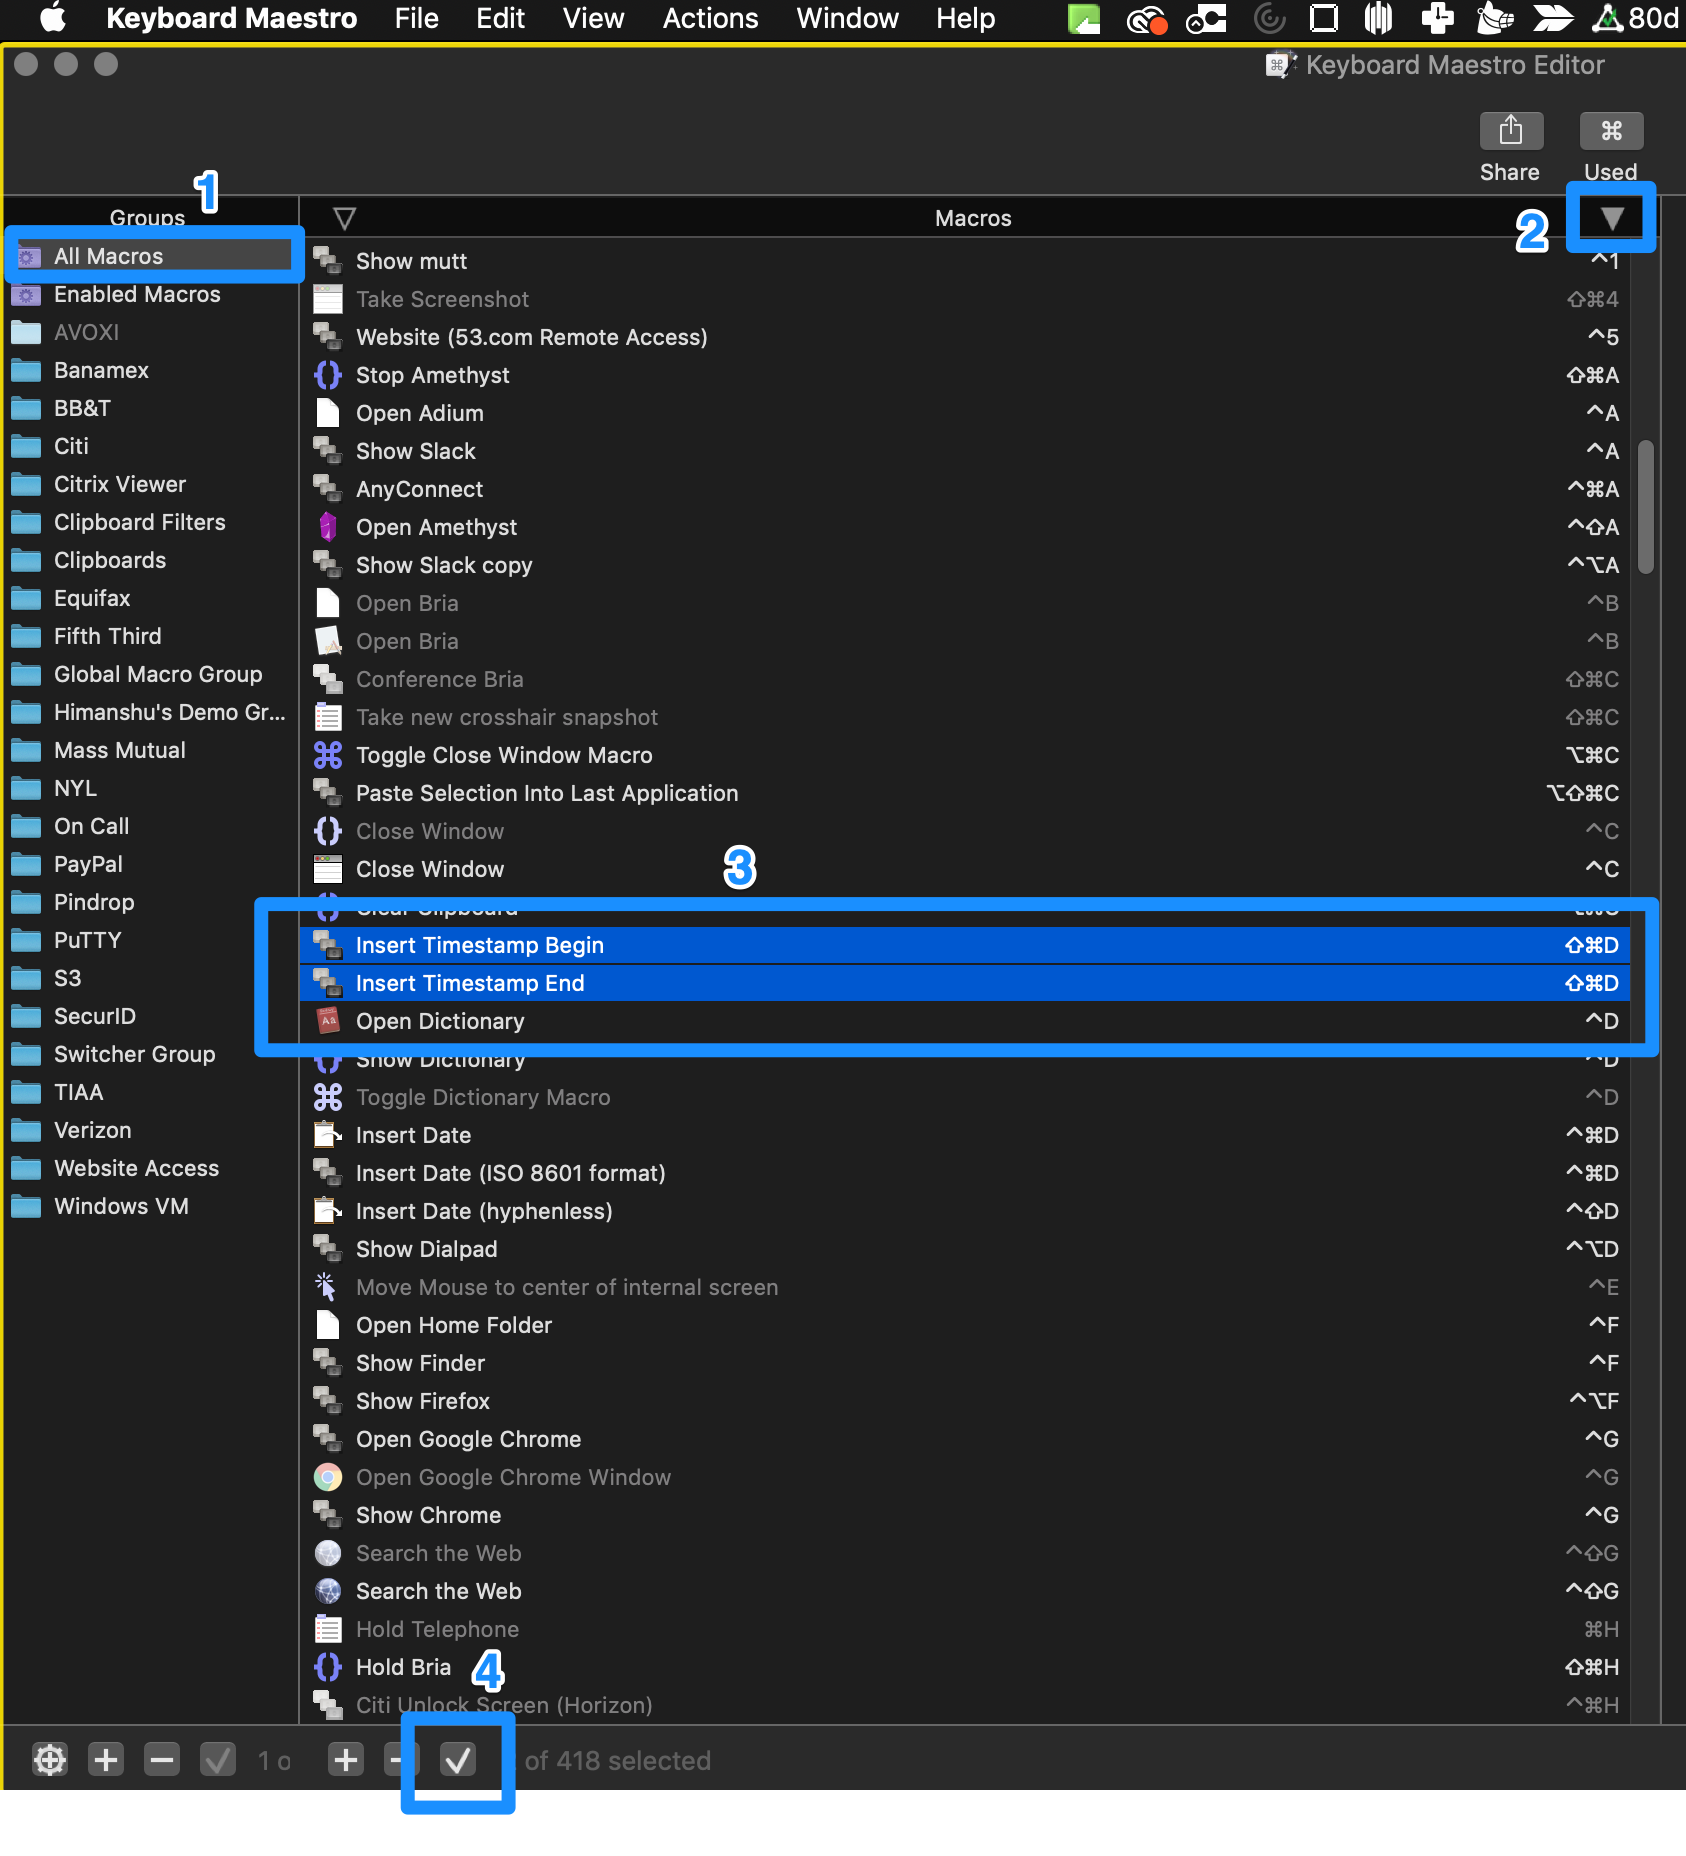 . To select multiple macros hold down the
"Command" ('⌘') key and click each desired macro. Then click "Enable or
Disable Macro" at the bottom of the Keyboard Maestro Editor window, in the
center pane under "Macros".
. To select multiple macros hold down the
"Command" ('⌘') key and click each desired macro. Then click "Enable or
Disable Macro" at the bottom of the Keyboard Maestro Editor window, in the
center pane under "Macros".


- If desired, you can modify the trigger for these macros at this time:
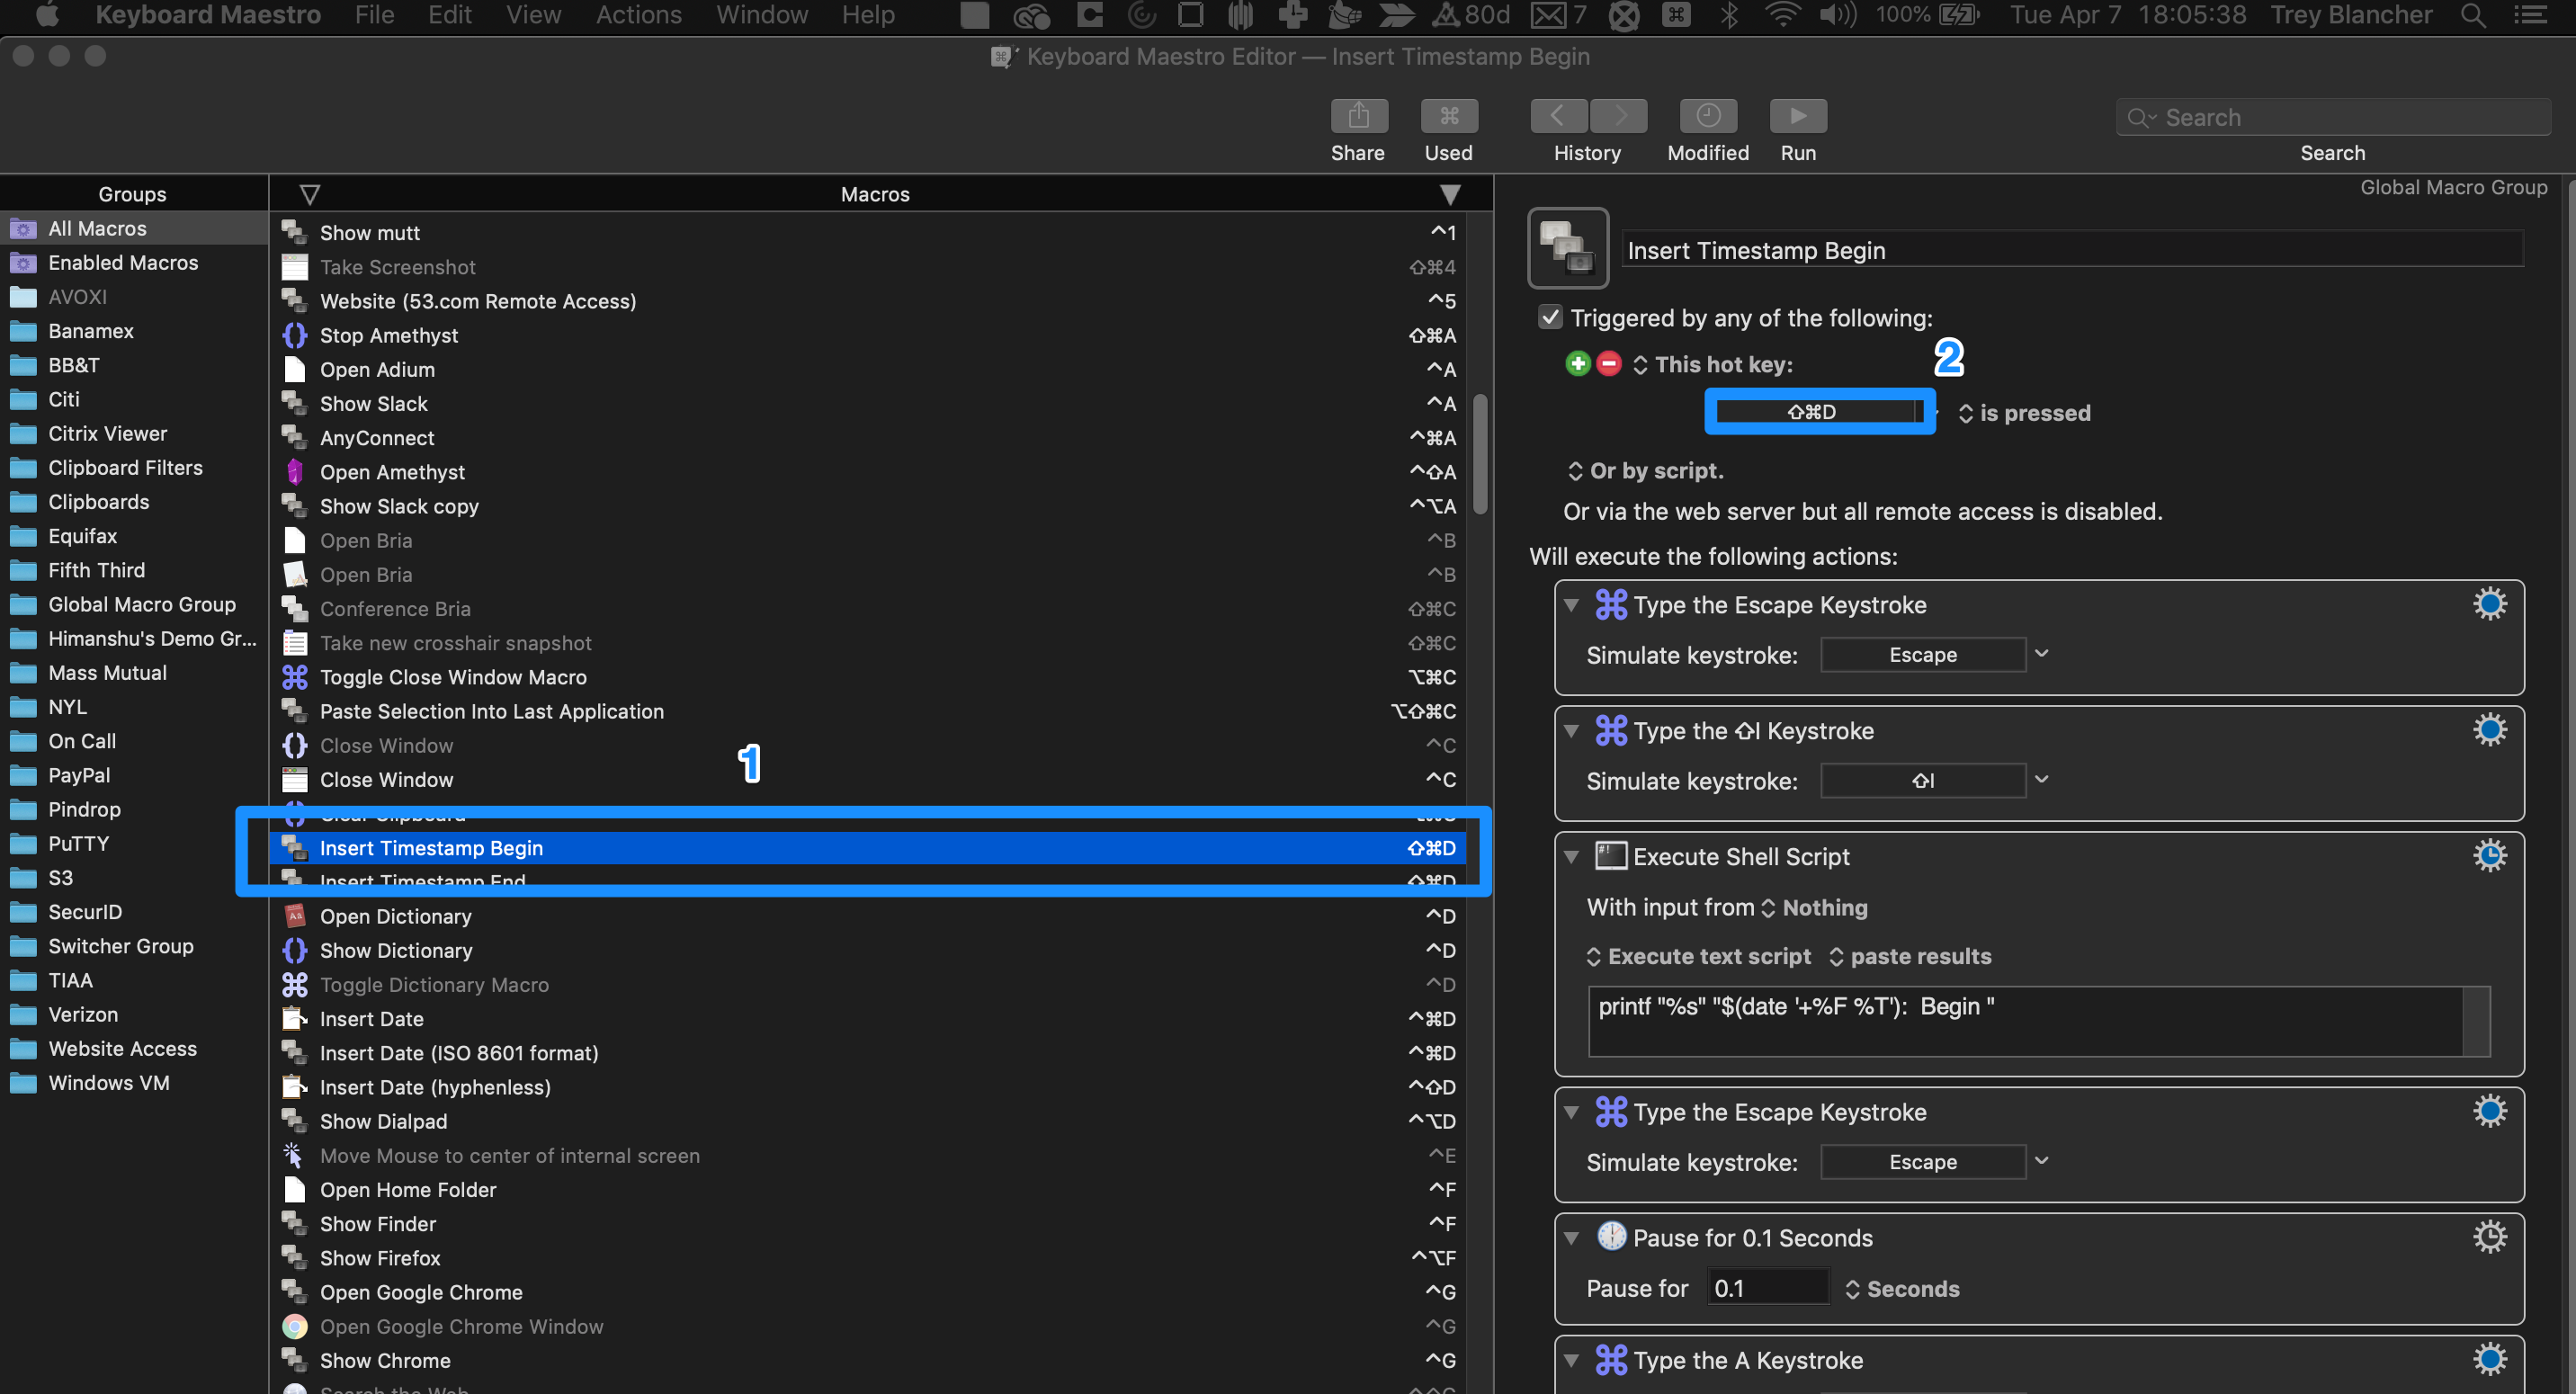 . You'll have to do this for each macro
individually.
. You'll have to do this for each macro
individually. - As imported, the Begin and End macros are triggered by: ⌘+Shift+D

-
You can repeat the above process for the "Insert Date (ISO 8601 format)" macro, which will allow you to quickly type out today's date in ISO-8601 date standard formate (e.g., "2020-04-07").
-
Now that you have the basic Begin and End macros imported and enabled, you can begin using them. In your favorite terminal emulator (e.g. Alacritty, iTerm2, Kitty, or Terminal.app), open vim on today's log file:
sh cd ~/timetracker vim 2020-04-07.logOr, if you prefer, use gvim or Mac vim GUI programs.
-
If you haven't already, copy the .vimrc file from the timetracker Git repository to your home directory (
/Users/<username>/, or~/). If you already have a .vimrc file that has your own customizations in it, consider adding the following line to your .vimrc:nmap Y y$If you do not do this you will have to modify the vim macro (see below).
-
The Keyboard Maestro macros make use of the
@avim macro. To record it in vim:- Press
q, then release, and then typea. You should now seerecording @ain the vim status line at the bottom of your vim window. - Press Escape (
Esc) to go into normal/command vim mode (where you can navigate withhjklkeys). - If you are using the timetracker .vimrc, or have made the suggested edit to your own .vimrc, type the following keys:
klYjp- If you are not using the timetracker .vimrc, and have not made the suggested edit to your own .vimrc, type the following commands instead:
kly$jp- Press
qagain to stop recording the macro. - Trigger the vim macro by typing
@a(the "Insert Timestamp End" macro does this automatically).
What these vim macros do is copy the category and task name from the above line (should be a Begin task), and paste it to the end of the End line. This should eliminate any mistakes when setting the end time of a task. Note that if a mistake is made on the Begin line, that mistake will be propagated to the End line when the "Insert Timestampt End" macro is executed.
- Press
-
Both the "Insert Timestamp Begin" and "Insert Timestamp End" macros automatically press the Escape key (
Esc), so you can trigger them from normal/command mode, or insert mode. In vim, trigger the "Insert Timestamp Begin" macro by typing⌘+Shift+D, thenB(or whatever you changed the trigger to be). If you haven't changed the trigger, a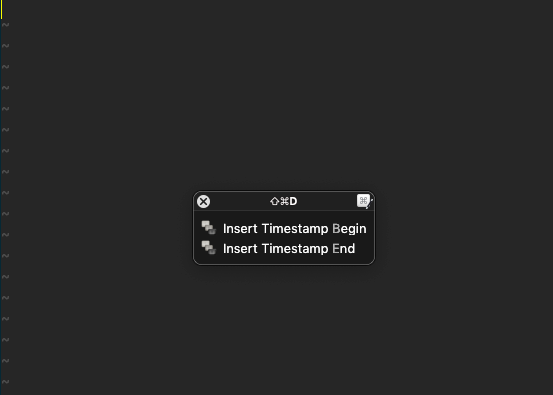 will pop up, where you can choose the desired
macro (either with your mouse, or by typing
will pop up, where you can choose the desired
macro (either with your mouse, or by typing Bfor Begin, orEfor End). -
If you have chosen the "Insert Timestamp Begin" macro, you can type a category (
[In Square Brackets]), then the title of the task you are beginning. Note that the title is free form, but having square brackets in the title, outside of the category is untested. Any other characters should be valid.- NOTE: If you use the Rust programs for digesting your logs, having multiple sets of square brackets will cause the Rust program to panic. The older Python/Bash scripts handle this a bit more gracefully at the time of this writing.
-
When you're finished with the task, run the "Insert Timestamp End" macro. You should see the timestamp with the "End" keyword, and the category and title of the above Begin task copied verbatim. Then the macro will automatically print another Begin line, ready for the next task.
